2015年9月29日星期二

1 Channel DC Long Range Remote Control Gadget Controls Flashing LED to Scare Birds

Question from customer:
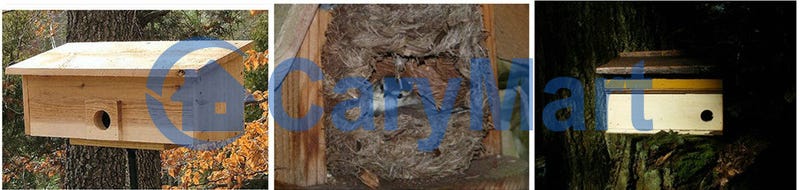
I want to use the 1 channel remote control to operate flashing LEDs in a tree to scare
birds in the evening from roosting.
1 Channel DC Long Range Remote Control Gadget Controls Flashing LED to Scare Birds
Answer:
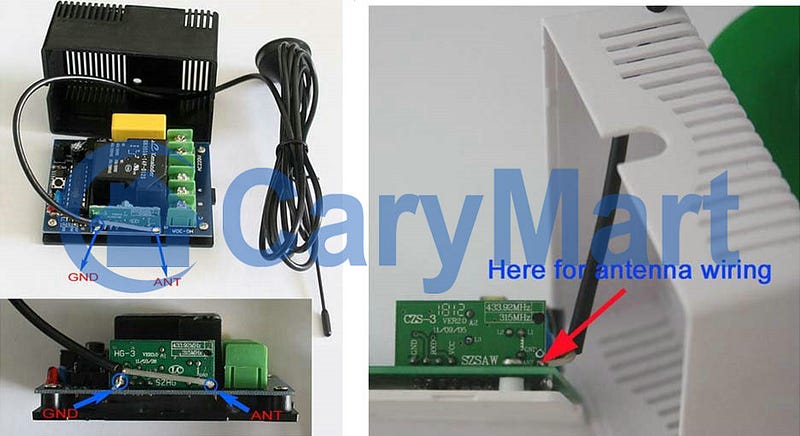
It is a good idea to scare birds from roosting in the evening by remote controlling a flashing LED because you must be very furious at noise to spoil your sweet dream or interfere with your other activities. Our suggestion is that you can choose this 1 channel dc triggered long distance remote gadget (S1X-DC12-ANT2+CB-2). You can wiring one flashing LED to relay channel. Flashing LED can get power from receiver directly. With external extended antenna, this remote gadget will transmit signal up to 2000m (6000ft) in the open field.
1 Channel DC Long Range Remote Control Gadget Controls Flashing LED to Scare Birds
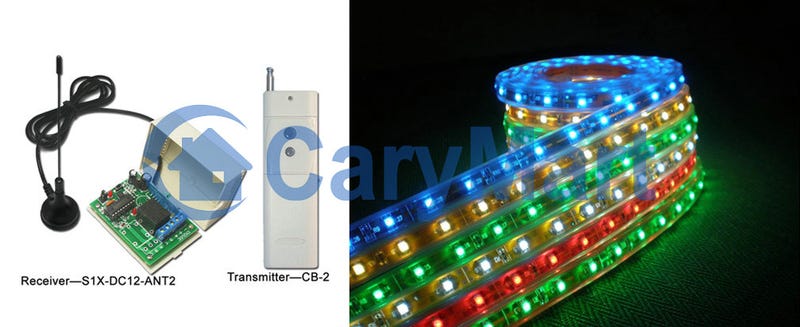
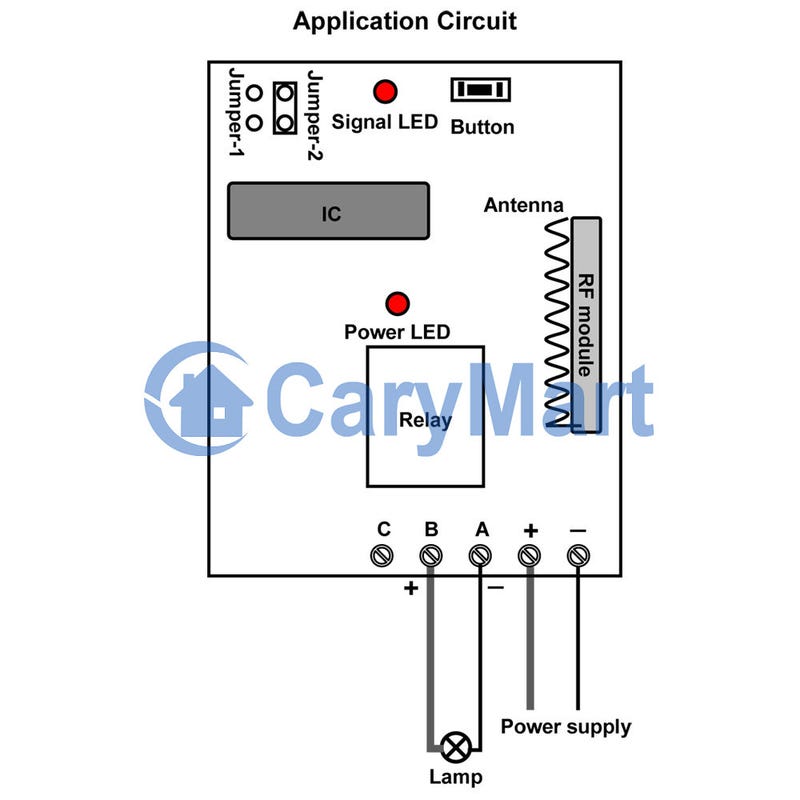
Here is the wiring diagram. Flashing LED is connected to terminals A&B of receiver. And supply power to receiver.
1 Channel DC Long Range Remote Control Gadget Controls Flashing LED to Scare Birds
Operation:
There are two working modes for your information. They are momentary and latched modes.
1. Setting control mode Momentary: Only connect Jumper-1.
Press and hold big button: Turn on the relay, terminal A&B output DC power. The flashing LED will keep flashing constantly.
Release big button: Turn off the relay, terminal A&B no output. There is no flashing from LED.
2. Setting control mode Latched: Do not connect Jumper-1 and Jumper-2. Press big button: Turn on the relay, terminal A&B output DC power. The flashing LED will be remote controlled and keep flashing all the time.
Press small button: Turn off the relay, terminal A&B no output. The LED is off.
Online shop: www.carymart.com

2000M Single Channel Heavy Duty Remote Control Kit for Vacuum Cleaner

Question from customer:
I want to remote control a motor of vacuum cleaner. It is 1400W, 220V and 6A. I wonder if you have any favorable suggestion for me ?
Answer:
Our suggestion is that you can choose our 1 channel high power ac voltage output long distance remote control kit (S1PX-AC220-ANT2 & CB-2). It is very convenient to you because you don’t have to supply any power for controlled device. Controlled device will get power through receiver when receiver is power on. The maximum current of this kit is 30amp. So it is more than your requirement.
Working distance of remote and receiver set is 2000m (6000ft) in open field if we add external extended antenna in it.
Here is the wiring diagram for your reference.
From the inside structure of vacuum cleaner above, we know that electric motor of vacuum cleaner is connected to OUTPUT L&N terminals. You can set latched working mode. Press big button, motor begins to work. The fan drives rotating brush to absorb dust from intake port to dust bag. You can start to vacuum rooms. Press small button, motor stops working. Vacuum cleaner stops vacuuming. Through this remote control, we can remote control vacuum cleaner on and off.
Online shop: www.carymart.com

How to Remote Control Truck Air Horn

The air horn is pneumatic device designed to create a remarkably loud sound for signaling purpose. Air horns are widely applied to vehicles, such as large semi-trailer trucks, fire trucks, trains, and some ambulances and ships as a signaling device. Someone would like to install air horn in his vehicle.
Recently, one of our customers wants to remote control his air horn in his truck. He needs a momentary remote that he can honk a "LOUD" horn located outside the toolbox in the box of his truck. It is a pneumatic horn that needs approximately 125PSI air. The air has to be momentarily transferred to the horn using a solenoid. The solenoid is controlled by applying 110volts. The 110 volts is obtained by the 3000watt inverter that is also inside of the toolbox in the box of the truck.
Our reply:
We recommend the remote receiver model of one channel ac direct power output and one button transmitter (S1X-AC220+C-1). The being controlled devices can get power supply from the receiver directly when the receiver is power on. The working current is 100V~240V.

The receiver will be mounted next to the solenoid inside the toolbox in the box of the truck. The transmitter can be mounted under the center post of the steering wheel (The transmitter is small enough for concealing).

He can honk the horn using a momentary working mode remote. When he press and hold the remote button, the solenoid will be open and air horn sends out extremely loud noise; When he release the remote button, the solenoid will be closed and air horn stops making a sound.
Online shop: www.carymart.com

High Power DC Remote Control Switch for 4 Flood Lights on Recreational Vehicle

Question from customer:
I want to use this remote kit to operate 4 ea.-12 volt flood lights on my RV (recreational vehicle) from inside my automobile if backing up at nighttime. I would keep one remote in my truck and one in the RV. Will this be a problem that the remote inside my truck will be at a distance of about 50 feet from the receivers inside the RV?
FLEETWOOD RV 2010 QUEST
Answer:
We recommend you 4 models of high power dc remote switch with direct power output (S1PX-DC12) and 2 long range transmitters (CB-4). Direct power output; controlling lights, motors, fans, electrically operated doors/locks/windows/blinds/cars or other appliances. You can turn on/off the receiver with transmitter (remote control) from any place within a reliable distance; the wireless RF signal can pass through walls, floors and doors. When it pairs with the long range transmitter, the working distance will reach 500m (1600ft) in the open field. There is no need to worry about the distance. The most important point is that encoding of receivers is same as the code of transmitters. So they can work together.
remote control

Wiring:
The wiring is very simple. According to the wiring diagram, each light should be connected to corresponding receiver and place to appropriate position. Each receiver is supplied 12V power supply.
circuit

Usage:
There are 3 operational modes. Toggle, momentary and latched modes.
Setting control mode Toggle: Only connect Jumper-2.
Press big button: Turn on the relay.
Press big button again: Turn off the relay.
Setting control mode Momentary: Only connect Jumper-1.
Press and hold big button: Turn on the relay.
Release big button: Turn off the relay.
Setting control mode Latched: Do not connect Jumper-1 and Jumper-2.
Press big button: Turn on the relay.
Press small button: Turn off the relay.
You can choose latched mode since you have two transmitters. As regards the latched mode, it is motivated by relay group. For relay group, only one relay will be on at a time. To be more specific, when you control the light by latched mode, you should prepare at least two buttons remote. Press button A, the light is on; press button B, the light is off.
Button A&B of first transmitter can control the first light. Button C&D of the first transmitter can control the second light.
Button A&B of second transmitter can control the third light. Button C&D of the second transmitter can control the fourth light.
Online shop: www.carymart.com

Forward & Reverse Motor Remote Controller for Trolley Winch

Question from customer:
I want a remote control to control a trolley winch. How can I add automatic stop sensors or switches to stop the motor when it gets to each end of the track?
trolley winch
Answer:
Actually, you don’t need to choose automatic stop sensors or switches to stop your motor because this AC power RF time delay motor remote controller (S1FD-AC220+CA-4) features forward-reverse-stop capability and limit switch function. You can rotate the motor in positive or reversal direction by transmitter from any place within a reliable distance, wireless signal pass through walls, floors and doors. With time delay function, the working time of positive/reversal rotation can be adjusted from 10 to 60 seconds. It is suitable for the motors of rolling blinds / doors, projection screens, awnings, pumps, winches, conveyors or other appliances and mechanicals.
remote controller

The receiver pairs with transmitter. You can press buttons on the receiver or transmitter to control motor as you like.
Here is the wiring. Connect the live wire to the “L”, and the zero wire to the “N”. Connect AC motor to the “OUT” and the zero wire. You can exchange output wires of motor to change the rotating direction of motor. There two limit switches”S1”&”S2”, if the motor is overdone, you can activate those switches to stop motor.
circuit
The usage of this control kit is very simple.
Press button ▲ on the receiver or remote: motor rotates in the positive direction, and it will stop after a certain delay time.
Press button ▼on the receiver or remote: motor rotates in the reversal direction, and it will stop after a certain delay time.
The delay time of positive / reverse rotation can be adjusted from 10 to 60 seconds.
Turn R1/R2 clockwise, prolong the delay time. Turn R1/R2 anti-clockwise, shorten the delay time. When you press button ▲ or button ▼, the motor starts to rotate; it will stop after the delay time is expired.
After press button ▲, you must press button ■ to stop the motor firstly, and then press button ▼.
If you pull out the Jumper of the receiver, you can press directly button ▼ after press button ▲.

Online shop: www.carymart.com

Remote Control Bumper Boy to Train Retrievers

BUMPER BOY was designed to provide a complete training system for dog trainers that have working retrievers, of any age.
One of our customers had a fake homemade bumper boy thing which he used for dog’s hunting drills. The bumper boy was manual operation. Recently, he brought our 2 channel dc 2000m remote control kit to do some retrofit for his dog training system because he wanted to remote control bumper boy. Definitely, it works. Let’s come to see how he retrofits the bumper boy system.
Parts:
2 channel 12V long range remote control kit
12 volt camcorder battery that had on off switch and comes with charger
2 -1/4 inch stereo jacks (one for each servo)
1 - Sandwich box
Procedure:
He just put an 8 relay RF receiver on his 8 shot bumper boy. At first, he put an 8 relay RF receiver and 12 volt battery in the box. Basically he needed a relay for every shot or function. This was a two relay unit for his two shot homemade bumper boy.
He did not put a sound board or buzzer on receiver due to he would never use it. He soldered all his connections together and put a wire nut on them which was just used to protect them.
He used speaker wire to tie everything together. He has used this unit out to 200 yards.


The whole thing was so easy to put together as it was fairly self explanatory. If somebody would email him pcs of the wiring system on their bumper boy, he could see if this system like this would work for them.
Online shop: www.carymart.com

PIR Motion Sensor Detector Controls Solenoid Valve

Question from customer:
I am searching for a motion detector controls a solenoid valve which works in a tank for hand-washing.
Answer:
We recommend this Mini Infrared PIR Motion Sensor Detector model of 0040101. The module can accurately detect any moving objects within the detective range and commonly be used to detect human body movement. It has higher sensitivity and broader detective range than others. The motion sensor detector will work with the solenoid valve.
 
Wire the solenoid valve to the detector according to the wiring diagram.
When someone puts his hands under the tap, the PIR motion sensor detector will detect and indicate the solenoid valve installed on the tap to open. The water will trickle out from tap for hand washing. It lasts about 20 seconds. The water will stop trickling out after 20 seconds.
Online shop: www.carymart.com

Long Range Single Channel Remote Controls Doorbell

Question from customer:
I want to install a single channel remote to control my doorbell within the range of 100m. The old 12V doorbell was broken because of the construction which cannot be repaired. Ordinary wireless doorbell cannot be used because of distance. I have an idea that a transmitter is connected to the doorbell button and relay in receiver is connected to doorbell. The only problem is the control range of remote need to reach about 100m. Would you like to recommend some favorable products?
Answer:
We recommend the long range dc power receiver S1U-DC12-ANT2 and one button transmitter CP-1.
Working voltage range of receiver is 12V. With normally open and close terminal, the voltage of the device being controlled is AC110~240V or DC0~28V. So it can be applied in 12V doorbell. And the most significant is that it has extended external antenna which makes its control range up to 2000m (6000ft). You will be satisfied with this product.
According to your requirement, you can connect the button of the bell to the transmitter by two wires. Then connect the bell to the relay in the receiver.
Setting control mode Momentary: Connect Jumper-1.
When you press the button of the bell, RF signal will be sent out from transmitter to receiver. The receiver receives to turn on the relay, then the doorbell rings. Release the button, the doorbell stops ringing.
Online shop: www.carymart.com

12-Channel DC Remote Control Switch Controls 6 DC Motors

One of our customers wants to control 6 dc motors with transmitter. Each two buttons can switch every motor to rotate from different direction. That is to say, one button to make motor run one direction, another button to make motor go in the other direction. He is wondering if our product can satisfy his need.
Here we recommend this model—12 channel dc remote control switch (S12CA-DC09/12/24 & CV-12) includes one 12-button remote transmitter and one 12-channel receiver. Each remote button controls each channel of receiver on and off. It can be used to control at most 12 same or different on / off electrical devices. But it only can be used to control 6 motors for every two relays in the receiver can control one motor to rotate in forward and reverse. Remote distance is up to 500m.
We will make a demonstration to this customer.
First, we should prepare those materials.
1 x 12 channel dc remote control receiver (S12CA-DC12)
1 x 2-button remote transmitter (CV-12)
2 x dc12v power adapters
6 x motors
Some lines
Next, we try to connect 6 motors to this receiver. Look at the following wiring diagram and picture. The wiring is just a little complicated. B is common terminal. Each motor is supposed to be connected to B terminals of every two relays. A is normally closed terminal and C is normally open terminal. Connect terminal C to the positive and connect terminal B to the negative. We connect motors one by one.

Operation
There are 12 working modes in it. Here we only choose the momentary mode for demonstration and control motors at random.
Control Motor 1
Press and hold button 1, motor rotates in positive direction; Release button 1, motor 1 stops. Press and hold button 2, motor rotates in reverse direction; Release button 2, motor 1 stops.
Control Motor 4
Press and hold button 7, motor rotates in positive direction; Release button 7, motor 4 stops. Press and hold button 8, motor rotates in reverse direction; Release button 8, motor 4 stops.
Control Motor 6
Press and hold button 11, motor rotates in positive direction; Release button 11, motor 6 stops. Press and hold button 12, motor rotates in reverse direction; Release button 12, motor 6 stops.
Online shop: www.carymart.com

How to Make Sprinkler Controller Control Valve Wirelessly

Question from Customer:
I am trying to design and build a remote switch system for my sprinkler system. I need to use the sprinkler controller (12v output for on) to trigger a transmitter to switch a 12v operated valve on the other side of the yard (about 300m away.) I have mains power at both locations but the underground 12v wire from the controller has been damaged so I would like to build a remote system to save putting new conduit for around 300m across the yard.
Looking at your systems, the easy part would be the receiver end because I would only need a 12v power supply. The hard part will be getting the transmitter to switch on when the sprinkler controller switches on (12v).
Answer:
We recommend direct power output high power long range remote control kit—S1PX-DC12-ANT2+CB-2V. The remarkable feature of this kit is that its transmitter is triggered DC power 5~28V input. That is to say, the transmitter will send out RF signal to receiver as long as it gets a 5~28V voltage from a device. Besides this advantage, its working distance is up to 2000m (6000ft). And the working current is 30amp. RF signal can pass through doors, walls and other obstacles.
Look at the following simulated diagram. The sprinkler control controls the valve box through the underground electrical wire initially. Unfortunately, the wire has been damaged. However, customer is unwilling to put new conduit for about 300m across the yard.
So using our product to solve this problem is a wise choice. We connect the black wire of transmitter to the common wire of sprinkler controller; Connect the red wire of transmitter to wire from controller to valve. On the other hand, in the control valve box, valve common wire is supposed to be connected to the negative terminal of receiver; valve wire should be connected to the positive terminal of receiver. (As the following application circuit shown)

When you switch on sprinkler controller, the transmitter will be triggered by 12V voltage from sprinkler controller and sent out RF signal to indicate receiver to work. The valve is open and it starts the irrigation. Likewise, you switch off sprinkler controller, the triggered transmitter will indicate receiver to stop working. The valve is closed and it stops the irrigation.
There is no need to put new wire between sprinkler controller and valve control box. It is no longer the hardest part of getting transmitter to switch on when the sprinkler controller switches on.
Online shop: www.carymart.com

Using Vibrator to Increase the Speed of Serve in the Restaurant

"I have been waiting so long, I just want to know where are my ordered dishes. Be quick, please", a client complained again.
The manager was so upset because clients always complained of the speed of serve in her restaurant. Clients didn't know that the kitchen was in basement, but the dining hall was on the first floor.
Servers in that restaurant always didn’t realize whether dishes are done or not to serve clients in time because they actually didn’t hear call from kitchen staffs. So the manager just wanted to solve this communication problem between kitchen staffs and servers. She found out an  effective way to deal with this problem. She found that vibrator receiver is a useful gadget for her servers.
 
She only put the vibrator into his servers’ pocket. When dishes ordered are done, the staffs in kitchen only press the button on the transmitter. The vibrator will vibrate and remind servers to serve dishes to customers. The vibrator kit works up to 1000m and the wireless signal can pass through walls, floors and doors. The scope between kitchen and dining hall is sufficient. In addition, this vibrator is powerful enough so that the servers will still feel the vibration when they are walking.
So servers can serve dishes to customers as soon as dishes are done. Clients enjoy both delicious food and excellent customer service.
Online shop: www.carymart.com

Great Range Remote Control Lights in Basement

Question from customer:
I want to remote control two lights which are both 90W 220V in the basement from the ground floor. So I need to buy a set remote controller kit. It will be installed in the basement and will be controlled by one controller. I can control  from the ground floor leisurely and carefree. What’s your suggestion?
Answer:
Our suggestion is the kind of great range remote controller set.
Its receiver is 2 channels and with external extended mount antenna. And its transmitter has 2 buttons. At first, you can do some wiring according to our application circuit.
Operation:
You can choose “Toggle Mode”. Only connect Jumper-2.
Press big button: Turn on the light 1. Press big button again: Turn off the light 1.
Press small button: Turn on the light 2. Press small button again: Turn off the light 2.
That is so easy to operate.
Online shop: www.carymart.com 

Remote Controlled Lighted TAXI Sign for Hotel Clients

A receptionist works in a very prominent hotel in downtown. He wants remotely control lighted TAXI sign outside of hotel at night (The taxi is not allowed to drive too close in front of hotel gate). When clients need to call a taxi, he only presses a button to switch on TAXI sign. The taxi drivers will drive to hotel carry clients. He can switch off TAXI sign by remote controller when drivers carry clients away.
What an exactly good idea! It is so convenience both to clients and receptionist. The practice may be not complicated if you use our wireless long range remote control kit.
These are transmitter and receiver. With external extended antenna of the receiver, the whole kit’s transmitting distance can reach 2000m (6000 ft). Maximum working current is 10A. The RF signal can pass through doors, walls and trees as well as other barriers. Lighted TAXI sign can be controlled remotely. Such a solution is an effective way to avoid running back and forth for hotel staff. Taxi driver will appreciate it because he carries clients in time and get earning as soon as possible. The lighted TAXI sign will be connected to the receiver as the following picture shown.
When clients need to call taxi, receptionist in hotel can press big button on the transmitter. Then the TAXI sign will shine. When taxi driver see lighted sign, he will come to drive client.
When client is carried away, receptionist can press small button switch off the taxi sign. Receptionist is very pleased with the operation of the TAXI sign and enjoys the great range of the remote control.
Online shop: www.carymart.com