显示标签为“remote control motor”的博文。显示所有博文

2015年11月6日星期五

How to Remote Control Winch Motor Up and Down

One of our customers wanted to have a remote control kit to replace his manual switch bar to control his winch motor running up and down. This is his original wiring diagram. AC 110V will input via white wire and black wire. Through converter, AC 110V will be converted to direct current. In the violet circle, this is the manual switch control area. He has to use control switch bar to control winch motor up and down. He thought that it is inconvenient to him. So he wondered if there is a favorable remote controller for him to solve this problem.
replacement part 1
We recommend him a 2 Channel 30A remote control kit(S2U-AC220+C-3) which features in 30A high power current. It controls lights, motors, fans, electrically operated doors/locks/windows/blinds/cars or other appliances with voltage AC110~240V or DC0~28V which is normally open and closed contact.
1_01
Our thought is that the red circle part in the following picture will be replaced by our RF receiver.
replacement part
So we drew a wiring diagram. The Black and Red wires (picture above )will be connected to terminals C and terminals B on relay 1&relay 2 respectively. White and Brown wires(picture above) will be wired to Motor.
remote control winch motor
There are 4 controlling modes for your reference. They are toggle, momentary, latched, momentary + toggle. As for motor controlling, we suggest momentary mode.
Setting control mode Momentary: Only connect Jumper-1.
Control mode Momentary: Press and hold -> On; Release -> Off.
Press and hold button A of remote: Turn on relay 1, motor runs up.
Release button A: Turn off relay 1, motor stops.
Press and hold button B of remote: Turn on relay 2, motor runs down.
Release button B: Turn off relay 2, motor stops.

Online shop: www.carymart.com

2015年11月5日星期四

A Easy Way to Control High Current Load Motor Remotely

Reversing dc motor can be applied to rolling blinds / doors, projection screens, awnings. Pumps, winches, conveyors or other high power electrical appliances and equipment can be run by ac high current load motor.But how to remote control the high current load motor? Under this circumstance, we usually adopt contactor to help starting when we try to start high current load motors. A contactor is an electrically controlled switch used for switching a power circuit, similar to a relay except with higher current ratings. Contactors are heavy-duty with overload protection devices used for switching electric motors, lighting ,heating, capacitor banks , and other electrical loads.
Here take ac high power motor for example.
Firstly you need to prepare:
1 x 1 channel receiver in ac 220v (specially design for motor forward and reverse rotation)
1 x 4 buttons transmitter
AC power supply
Some lines
S1FC-AC&CV-4&contactor-control motor-preparation copy
The motor controller contains one transmitter and one receiver.
It features forward-reverse-stop capability. You can rotate the motor in forward or reversal direction by transmitter from any place within a reliable distance; wireless signal pass through walls, floors and doors.
motor remote controller
Wiring:
Two contactors will act as a bridge between remote controller and high power motor to help activate high power motor to rotate in positive and reversal position.
S1FC-AC&CV-4&contactor-control motor-wiring
Operation:
Press button ▲ on remote: Motor rotates continuously in positive direction.
S1FC-AC&CV-4&contactor-control motor-rotate forward on
Press button ■ on remote: Stop the motor.
S1FC-AC&CV-4&contactor-control motor-rotate forward off
Press button ▼ on remote: Motor rotates continuously in reversal direction.
S1FC-AC&CV-4&contactor-control motor-rotate reverse on
Press button ■ on remote: Stop the motor.
S1FC-AC&CV-4&contactor-control motor-rotate reverse off
Online shop: www.carymart.com

2015年10月14日星期三

Utility Smartphone WIFI Controller for iOS Control DC Electric Curtain Motor

Electric curtains may be installed in many families. Compared with traditional curtain, electric curtain is very convenient to people. We can use remote controller to control it. In case, your remote controller is broken or you want to DIY electric curtain, you can use our utility Smartphone WIFI Controller. WLAN WIFI is extensively used nowadays, so we combine remote controller with WIFI network to make useful sort of product.  If you use this WIFI controller, only to use your cell phone as a transmitter, you can control your device within a reliable distance with WLAN.
electric curtain
It is applied in smart home, instruments, equipment control and modern agriculture field. WIFI remote controller controls many kinds of lights, motors, fans, electric doors/windows, aircraft, cars components, toys, rolling blinds, water pumps, winches or other electric devices with voltage AC110~240V or DC0~28V by its normally open and closed terminals.
wifi controller
This WIFI controller supports both 2.1 ~ 4.0 version Android software system and 4.6 ~ 6.1 version iOS software system. And we’d like introduce how to control DC motor under the iOS system. This controller works on the jailbroken iPhone, iPad, iPod Touch. Let’s see the procedure.
WF-8-1R iOS material
Here is the wiring diagram and picture. Motor is connected to common terminal ”B”. And normally open terminal“C” is connected to positive wire. Normally closed terminal “A” is connected to negative wire.
0022001 wifi
WF-8-1R iOS wiring
After finishing wiring, we switch on power. The LEDs of “Power”, “Ready” and “Link” are on one by one. We begin to operate.
inner circuit
WF-8-1R iOS power on
After wireless network connection, press the icon of WIFI Controller software to turn on it.
WF-8-1R iOS connection
There are 3 modes in common use. They are toggle, momentary and latched. But we usually use momentary for motor controlling.
WF-8-1R iOS shift mode
Press and hold button 1, it is the motor’s positive rotation. Release button 1, it is motor’s stop.
WF-8-1R iOS button 1
Press and hold button 2, it is the motor’s reverse rotation. Release button 2, it is motor’s stop.
WF-8-1R iOS button 2
Video:
[youtube]http://www.youtube.com/watch?v=DdwwR96LP_Y&feature=youtu.be[/youtube]

Online shop: www.carymart.com

2015年10月13日星期二

1 Channel 12V Voltage Output Remote Control Unit Switch Motor On/ Off—2000M

Question from Customer:
I seek a transmitter-receiver 12V to run a small motor away from 300~500 meters with operating on off.
Answer:
Our suggestion is this 1 channel 12V voltage output remote control gadget (S1X-DC12-ANT2 & CB-2). Single channel is for one device. 12V direct power output can supply power directly to the device which is controlled. User can turn on/off the receiver with transmitter (remote control) from any place within a reliable distance; the wireless RF signal can pass through walls, floors and doors. The receiver, which mounts long range magnetic antenna, pairs with long distance transmitter to reach to 2000m in the open field.
remote control unit&motor
There are 3 control modes. They are Toggle, momentary and latched.
Setting control mode Toggle: Only connect Jumper-2.
1) Press big button: Turn on the relay.
Press big button again: Turn off the relay.
2) Setting control mode Momentary: Only connect Jumper-1.
Press and hold big button: Turn on the relay.
Release big button: Turn off the relay.
3) Setting control mode Latched: Do not connect Jumper-1 and Jumper-2.
Press big button: Turn on the relay.
Press small button: Turn off the relay.
As regards controlling motor on and off, we suggest the latched mode. Latched mode is really favorable for long range controlling because big button on transmitter is for ON, small button is for OFF. If you want to turn on motor, you can press big more for many times to make sure that the motor is on. If you want to turn off motor, you can press small more for many times to make sure that the motor is off.
For the wiring, it is so simple. The following picture shows. Motor is connected to terminals A&B on the receiver. The receiver should be supplied 12V power. There is no need to supply power to motor because motor can get power from the receiver.
receiver
Online shop: www.carymart.com

2015年10月10日星期六

8 Channel DC 9V Remote Controller Controls Electron Microscope’s 4 Motors Rotation

Question from customer:
I use a manual switch to control 4 9V motors of my electron microscope and each motor works in 150ma (0.15a). In addition, only one motor works when I press button of remote control each time. Now I want to remote control them, have you got any suitable remote for me?
Electron microscope:
IMG_8863
Manual Switch of microscope:
IMG_8864
Answer:
We thought this 8 channel rf remote transmitter & receiver is very suitable for you . It can be used to control at most 8 on / off electrical devices. With characteristics of strong anti-interference, reverse power protection and over current protection. Three voltages dc9v, dc12v and dc24v are provided to choose. It is widely applied to control many kinds of lights, electrically operated doors / gates / windows / blinds and so on. It works with 8-button transmitter and their transmitting distance can reach to 500m.
1
This is the wiring diagram.
circuit
Wire each motor to the normally open terminal “B”. According to the diagram, you can do wiring like above. Even though there are 8 working modes in it, you can choose ”Momentary mode” which is applied in motor’s rotation.
Control mode Momentary (Channel 1~8): Press and hold -> On; Release -> Off.

Press and hold button 1: Motor 1 rotates in positive direction
Release button 1: Motor 1 stops rotation
Press and hold button 2: Motor 1 rotates in reverse direction
Release button 2: Motor 1 stops rotation

Press and hold button 3: Motor 2 rotates in positive direction
Release button 3: Motor2 stops rotation
Press and hold button 4: Motor 2 rotates in reverse direction
Release button 4: Motor 2 stops rotation

Press and hold button 5: Motor 3 rotates in positive direction
Release button 5: Motor 3 stops rotation
Press and hold button 6: Motor 3 rotates in reverse direction
Release button 6: Motor 3 stops rotation

Press and hold button 7: Motor 4 rotates in positive direction
Release button 7: Motor 4 stops rotation
Press and hold button 8: Motor 4 rotates in reverse direction
Release button 8: Motor 4 stops rotation

Only one motor works when you press the corresponding button on the remote.

Online shop: www.carymart.com

2015年9月29日星期二

Forward & Reverse Motor Remote Controller for Trolley Winch

Question from customer:
I want a remote control to control a trolley winch. How can I add automatic stop sensors or switches to stop the motor when it gets to each end of the track?
trolley winch
Answer:
Actually, you don’t need to choose automatic stop sensors or switches to stop your motor because this AC power RF time delay motor remote controller (S1FD-AC220+CA-4) features forward-reverse-stop capability and limit switch function. You can rotate the motor in positive or reversal direction by transmitter from any place within a reliable distance, wireless signal pass through walls, floors and doors. With time delay function, the working time of positive/reversal rotation can be adjusted from 10 to 60 seconds. It is suitable for the motors of rolling blinds / doors, projection screens, awnings, pumps, winches, conveyors or other appliances and mechanicals.
remote controller

The receiver pairs with transmitter. You can press buttons on the receiver or transmitter to control motor as you like.
Here is the wiring. Connect the live wire to the “L”, and the zero wire to the “N”. Connect AC motor to the “OUT” and the zero wire. You can exchange output wires of motor to change the rotating direction of motor. There two limit switches”S1”&”S2”, if the motor is overdone, you can activate those switches to stop motor.
circuit
The usage of this control kit is very simple.
Press button ▲ on the receiver or remote: motor rotates in the positive direction, and it will stop after a certain delay time.
Press button ▼on the receiver or remote: motor rotates in the reversal direction, and it will stop after a certain delay time.
The delay time of positive / reverse rotation can be adjusted from 10 to 60 seconds.
Turn R1/R2 clockwise, prolong the delay time. Turn R1/R2 anti-clockwise, shorten the delay time. When you press button ▲ or button ▼, the motor starts to rotate; it will stop after the delay time is expired.
After press button ▲, you must press button ■ to stop the motor firstly, and then press button ▼.
If you pull out the Jumper of the receiver, you can press directly button ▼ after press button ▲.

Online shop: www.carymart.com

2015年9月24日星期四

2 Channel Heavy Duty DC Motor Remote Controller

New DC 2 channel heavy duty motor remote controller model of 0020481 (S2PF-DC12/24 & CV-6) has been added to our online store! Unlike our previous motor remote controllers, this one can be used to control 2 motors rotating forward and reversal. Maximum working current is up to 30 Amp. As seen in the picture, this motor remote controller is applicable to control motors of lots of heavy duty electrical devices and equipment, such as electric winch, lathe, monocycle, two-wheeled vehicle, robot and golf cart.
Online shop: www.carymart.com

2015年9月21日星期一

Reversing Single Phase Capacitor Start Motor By Remote Controller

One customer said he had a 220V single phase capacitor start motor; it rotated in one direction (seen from the first picture below). And he'd like to change it to rotate in forward and reversal direction using our motor remote controller.
According to this picture, we learn that it can also rotate in another direction by changing wiring position of Red line and Yellow line.
We suggest him use motor remote controller model of 0020318 (S1FC-AC220 & CV-4). Picture on the following shows how to wire the motor and capacitor to the receiver. So that the motor can be remote controlled in forward and reversal direction.
Our shop online: http://www.carymart.com

2015年9月16日星期三

Remote control motor of TV sliding panel

The sliding panel mechanism can help the flat-panel TV blend in better with the wall surface. Instead of covering the panel with canvas artwork, the sliding panel mechanism conceals the TV with a panel that matches the existing wall surface. It offers the ultimate in look, functionality and wow factor.
One of our customers built a sliding panel mechanism to cover up the TV. It was started by an ac electric motor and he would like to add an wireless remote control kit to control it. We recommended him rf remote control system model of 0020318 (S1FC-AC220 & CV-4). It contains a remote transmitter and a receiver. With this wireless remote control kit, he can easily remote control motor.
Wire the electric motor to the receiver and it can be controlled by the remotetransmitter. Wiring diagram as shown below:
We have many remote control motor kits that can help you to remote control motor for your equipment.
Online shop: www.carymart.com

Remote control motor

Question from customer:
I’m looking for a wireless remote control kit to remote control motor of lawnmower in 800ft. Any suggestions?
700-590742
Answer:
We recommend the model of 500m/1500ft RF motor controller (S1FC-DC09/12/24 & CV-4-2) to help you remote control motor of lawnmower. The controller is activated by DC 9V, 12V and 24V. It is usually for motors of rolling blinds, doors, projection screens, awnings, pumps, winches, conveyor or other appliances and machines. It features in forward-reverse-stop capability which can make motor rotate in positive or reversal direction. With maximum transmission distance of 500m/1500ft, it can satisfy your requirement. Inner circuit of this kit uses the RF technology for making a wireless remote, which can make motor controlled by transmitter from any places with in reliable distance, this configured wireless signal can pass through walls, doors or floors or other solid obstacles.
1_13_1
Here is the wiring.
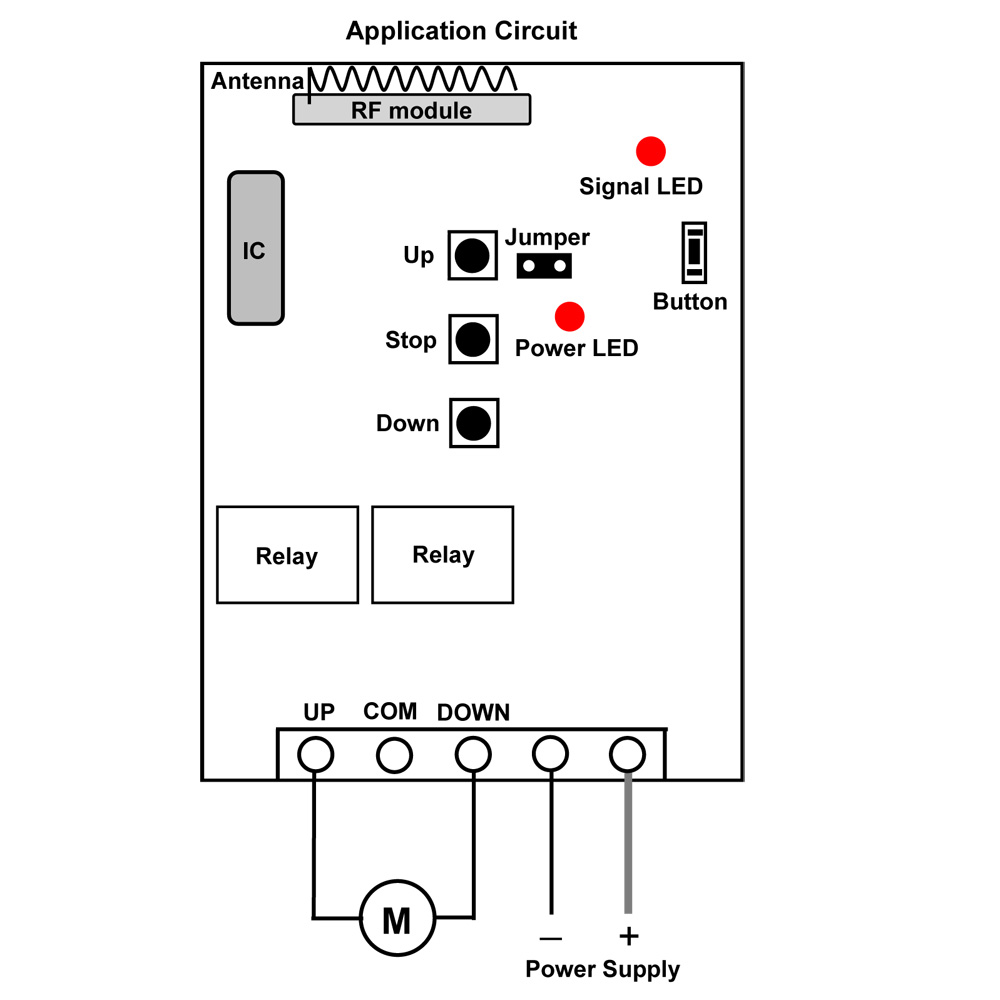
At first, we connect power line to terminals “+” and “-”. Secondly, we connect the receiver to the lawnmower actuator motor. Lawnmower motor is wired to UP and DOWN terminals of receiver. At last, we add power supply to receiver. You can exchange “UP” and “DOWN” lines of the motor to change rotating direction of the motor.
1_06
There two working modes in it.
Set Momentary control mode: Do not connect Jumper.
Press and hold button ▲ on remote or receiver: Terminals UP and DOWN output + DC9V / DC12V / 24V (UP: +, DOWN: -), lawnmower actuator motor rotates continuously in positive direction.
Release button ▲ on remote or receiver: Stop the motor.
Press and hold button ▼ on remote or receiver: Terminals UP and DOWN output - DC9V / DC12V / 24V (UP: -, DOWN: +), lawnmower actuator motor rotates continuously in reversal direction.
Release button ▼ on remote or receiver: Stop the motor.

Set Latching control mode: connect the Jumper.
Press button ▲ on remote or receiver: Terminals UP and DOWN output + DC9V / DC12V / 24V (1: +, 2: -), lawnmower actuator motor rotates continuously in positive direction.
Press ■ on remote or receiver: Stop the motor.
Press button ▼ on remote or receiver: Terminals UP and DOWN output - DC9V / DC12V / 24V (1: -, 2: +), lawnmower actuator motor rotates continuously in reversal direction.
Press button ■ on remote or receiver: Stop the motor.

By using this kind of wireless remote control kit, you can easily remote control motor.
Online shop: www.carymart.com